Feritscope FMP30

Measurement of the Ferrite Content in Austenitic and Duplex Steel
-
Fast Measurement and Data Storage
-
Robust Housing
-
Selectable Tolerance Limits
-
Calibration Standards Traceable to TWI
Feritscope FMP30
Chemical, energy, and processing plants are often subject to heat, aggressive media, and high pressure. These circumstances demand steel with high corrosion and acid resistance that are resilient even at high temperatures. If the ferrite content is too low, then the welded material is susceptible to hot-cracking, if the ferrite content is too high, the toughness, ductility as well as the corrosion resistance of the steel are reduced. For duplex steel, a ferrite deficit in the area of the weld seam results in stress corrosion cracking and reduction in strength.
The FERITSCOPE FMP30 measures the ferrite content in austenitic and duplex steel according to the magnetic induction method. All magnetizable structure sections are measured i.e., in addition to delta‑ ferrite also strain‑induced martensite, for example, or other ferritic phases.
It is suited for measurements according to the Basler‑ Standard and according to DIN EN ISO 17655. Areas of application are onsite measurements, e. g. of austenitic plating’s as well as weld seams in stainless steel pipes, containers, boilers, or other products made of austenitic or duplex steel.
Duplex steel is used increasingly in the chemical and petrochemical industries, e. g., for boilers and pipelines. A ferrite deficit in the weld seam area leads to strength reduction, an excess ferrite content to a reduction in toughness and ductility.
When welding duplex steel, the ferrite content in the welding area can easily assume unfavorable values either due to unsuitable welding filler materials or through poor heat input or heat removal. Only an onsite measurement can provide the assurance that the processing did not change the optimum ferrite content in an unfavorable manner at the expense of mechanical or corrosion‑resistance properties.

Measurement of the ferrite content of a weld seam
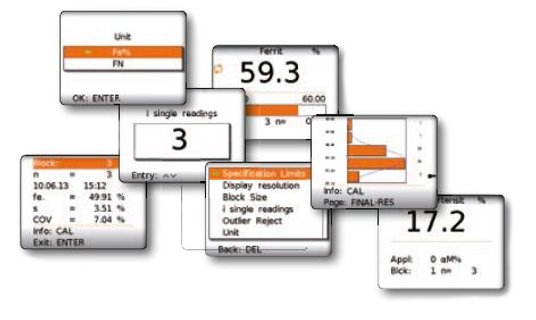
Large easy to read graphical display in several languages.

Introduction, Normalization and Calibration. Ferrite Measurement
Wherever austenitic or duplex steels must withstand heat, aggressive substances and high pressure, the ferrite content plays a crucial role. Especially when it comes to onsite measurements in chemical plants, energy utilities and process engineering plants, the advantages of the Fischer handheld devices become very evident. A range of probes are available for the FERITSCOPE FMP30, with which you can reliably determine ferrite content, even in hard-to-reach areas.
Features:
► Robust and handy device for fast and exact determination of ferrite content onsite
► Display of the measured value in ferrite percentage (% Fe) or as ferrite number (FE)
► Large and easily readable display with comprehensive functions
► Measures automatically as soon as the probe is applied
► Various probes available for reliable measurement even in hard-to-reach areas
► Large choice of calibration materials available
► Just one calibration required for the entire measurement area
► Also available as a module with full functionality for the stationary measurement instrument MMS PC2
Feritscope FMP30 Specifications
Instrument model: FERITSCOPE® FMP30
Display: Graphical backlit LCD display
Measurable coatings:
-
Ferrite content measurements in weld seams and claddings made of austenitic or duplex steel
-
Determination of the portion of deformation martensite in austenitic materials
Measuring modes: Magnetic induction measurement method
Dimensions:
-
Instrument: 170 mm x 90 mm x 35 mm (L x W x H)
-
LCD display: 44 mm x 57 mm (L x W)
Weight: approx. 340 g (without probe, ready to operate)
Permissible ambient temperature during operation: +10 °C ... +40 °C
Permissible storage temperature: + 5 C°... + 60 °C
Permissible relative air humidity: 30 ... 90% (non-condensing)
Power supply:
-
4 x 1.5 V batteries with about 50 h service life, (Size AA or Mignon) or
-
4 x 1.5 V NiMH rechargeable batteries with about 45 h service life at 2100 mAh, (Size AA or Mignon)
-
AC adapter 9 V 150 mA, 100V - 230 V
Power consumption
-
0.3 W with the LCD display not illuminated
-
0.5 W with the LCD display illuminated
Connectors:
-
Probe: 10-pin round plug
-
AC adapter: 2-pin barrel connector
-
Mini USB port for connecting a printer and a PC
Minimum time between two measurements: About 0.2 seconds in the free-running mode
Minimum lift-off distance between two measurements: min. 25 mm
Measurement range, trueness, and repeatability precision: Depends on the connected probe (These and other probe characteristics can be obtained from the brochure “Measurement Probes and Measurement Aids - Optimized Probes”) of Helmut Fischer GmbH Institute for Electronics and Metrology or can be requested from your authorized supplier or directly from Helmut Fischer GmbH Institute for Electronics and Metrology.)